Ultimate Guide to Installing & Maintaining Water Ripple Stainless Steel Sheets | From Material Selection to Long-Term Care

Targeting high-intent question-based long-tail keywords to boost search visibility and conversions

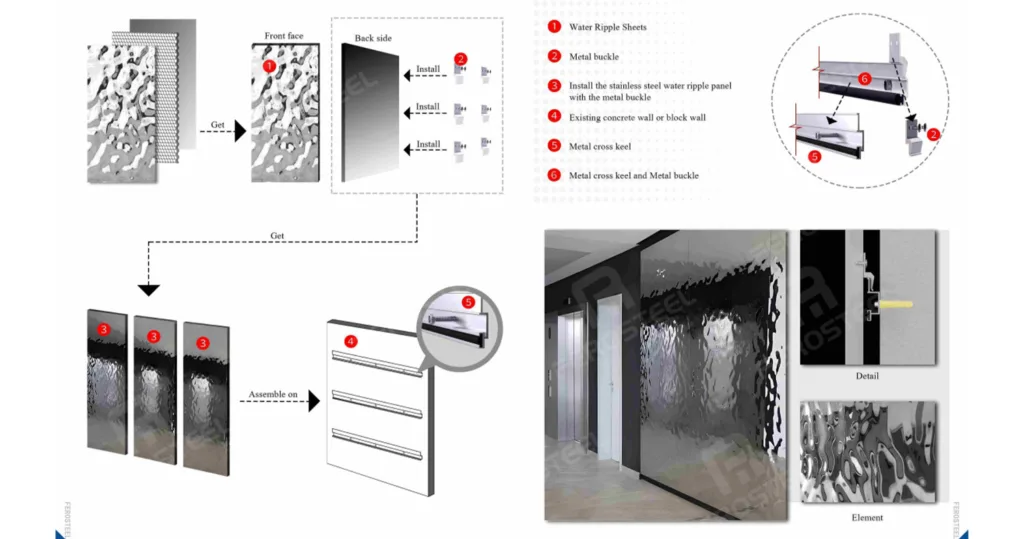
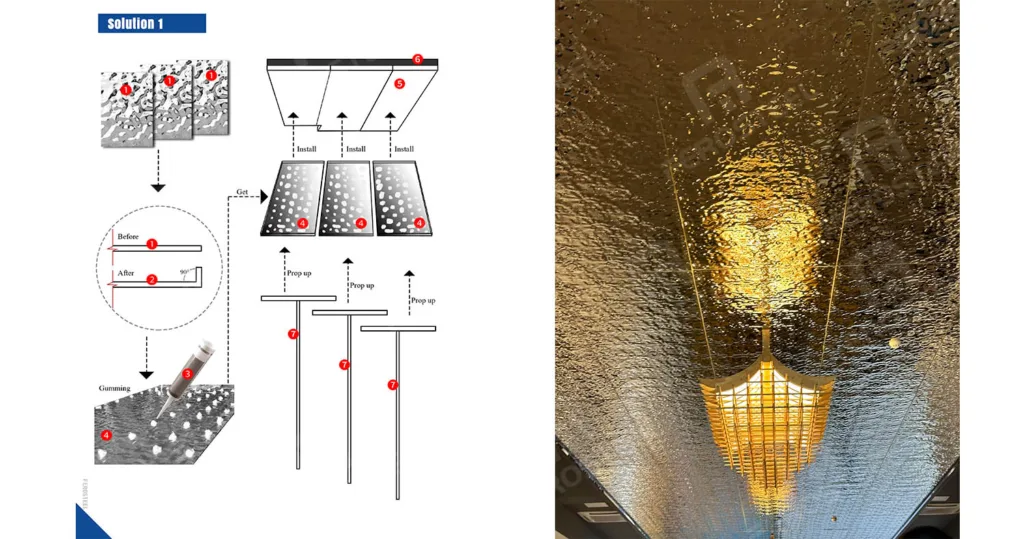
Water ripple stainless steel sheets have become a cornerstone of modern architecture and interior design, prized for their dynamic light-reflecting patterns and durability. However, installation complexities and maintenance challenges often frustrate users. This comprehensive guide combines industry standards, manufacturer protocols, and real-world data to address installation best practicescommon pitfalls, and science-backed maintenance strategies—ensuring project success and decades of aesthetic performance.

I. Pre-Installation Planning: Materials & Tools

1. Material Selection for Specific Applications

  • Grade Selection:
    • Indoor Decorative Use: 304 stainless steel (cost-effective, moderate corrosion resistance).
    • Coastal/High-Salt Environments: 316L stainless steel (with molybdenum, 50%+ better salt spray resistance).
  • Thickness & Ripple Scale:
    • Ceiling/Wall Cladding: 0.5-1.2mm sheets (lightweight, ideal for small ripple patterns).
    • Outdoor Facades/High-Wind Zones: 1.5-3.0mm sheets (large ripples enhance structural rigidity).
  • Surface Finishes:
    • Mirror Polish: Best for luxury spaces (e.g., hotel lobbies) but requires frequent fingerprint maintenance.
    • Brushed Finish: Ideal for outdoor use (reduced glare) and high-traffic areas (scratch-resistant).

2. Essential Tools & Accessories

  • Core Tools: Laser level, structural adhesive (e.g., 3M VHB tape), A2/A4-grade stainless steel screws.
  • Safety Gear: Cut-resistant gloves, safety goggles (for metal fragment protection).
  • Support Materials:
    • Plywood Backing Board (≥7mm thick for adhesive installations).
    • Galvanized Steel Framing (max 600mm spacing for load-bearing support).

Ideal For: Large commercial spaces (e.g., mall atriums), areas requiring hidden MEP access.
Procedure:

  1. Frame Assembly:
    • Use 50×50mm galvanized steel tubes (horizontal spacing ≤400mm, main beams ≤1200mm apart).
    • Anchor to concrete with expansion bolts (min. 50mm embedment depth).
  2. Sheet Mounting:
    • Pre-drill Φ4mm holes at sheet corners (≥20mm from edges).
    • Secure to frame using 304 stainless rivets or self-tapping screws (max 200mm spacing).
      Advantages:
    • Allows post-installation access for maintenance/repairs.
    • Load capacity: 15kg/m² (1.5mm sheets).

3. Wood Backing Board Integration

Perfect For: Curved ceilings, retro-style designs.
Key Steps:

  1. Backing Board Prep:
    • Use moisture-resistant MDF (≥10mm thick) with fire-retardant coating.
    • Cut 3-5mm deep grooves matching sheet dimensions (width = sheet flange +1mm).
  2. Sheet Installation:
    • Bend sheet edges 90° inward using a folding machine (5-8mm flange width).
    • Inject epoxy adhesive into grooves, press sheets into place, and clamp until cured (24hrs).

III. Post-Installation Troubleshooting

1. Uneven Joint Lines

Cause: Cutting inaccuracies or uneven substrates.
Fix:

  • Fill gaps with color-matched silicone sealant (neutral-cure, mold-resistant type).
  • Sand protruding areas with 800-grit paper (follow ripple direction).

2. Surface Scratches

Prevention: Keep protective film intact until project completion.
Repair:

  • Minor scratches: Polish with stainless steel compound (follow grain direction).
  • Deep damage: Return to manufacturer for re-embossing (keep 5% extra sheets).

3. Adhesive Failure

Warning Signs: Edge lifting or hollow sounds when tapped.
Emergency Repair:

  • Inject adhesive into voids, clamp for 24hrs.
  • Full reinstallation required for large-area detachment.

IV. Maintenance Mastery: 3 Longevity Strategies

1. Cleaning Protocols

  • Tools: Microfiber cloths (lint-free), pH-neutral cleaners (pH 6-8).
  • Frequency:
    • Low-traffic interiors: Monthly.
    • Kitchens/outdoors: Weekly (twice weekly during rainy seasons).

2. Corrosion Prevention

  • Coastal Areas: Apply stainless steel protectant (e.g., WD-40 Specialist Corrosion Inhibitor) quarterly.
  • Chemical Exposure: Post-installation nano-coating (contact angle ≥110° for oil/water repellency).

3. Professional Upkeep

  • Mirror Finishes: Annual electrolytic polishing (restores ≥90% reflectivity).
  • Brushed Finishes: Biannual grain restoration using OEM tools (match original brushing direction).

VI. Conclusion & Conversion Boosters

With proper installation and maintenance, water ripple stainless steel sheets can deliver 10+ years of flawless performance. For custom project consultations or certified installer referrals, submit your details below for expert support within 24 hours.

Limited Offer: Get your Water Ripple Sheet Maintenance Handbook—free today!
📥 Download Now

· You Might Also Like

Ⓒ 2019 - All Rights Are Reserved